I’ve installed openSUSE MicroOS on a Raspberry CM4 in my Turing Pi cluster. It turned out to be more difficult than I anticipated. But there’s an easy way on how to do this.
Installing MicroOS on a CM4 (eMMC) - The way of the sheep
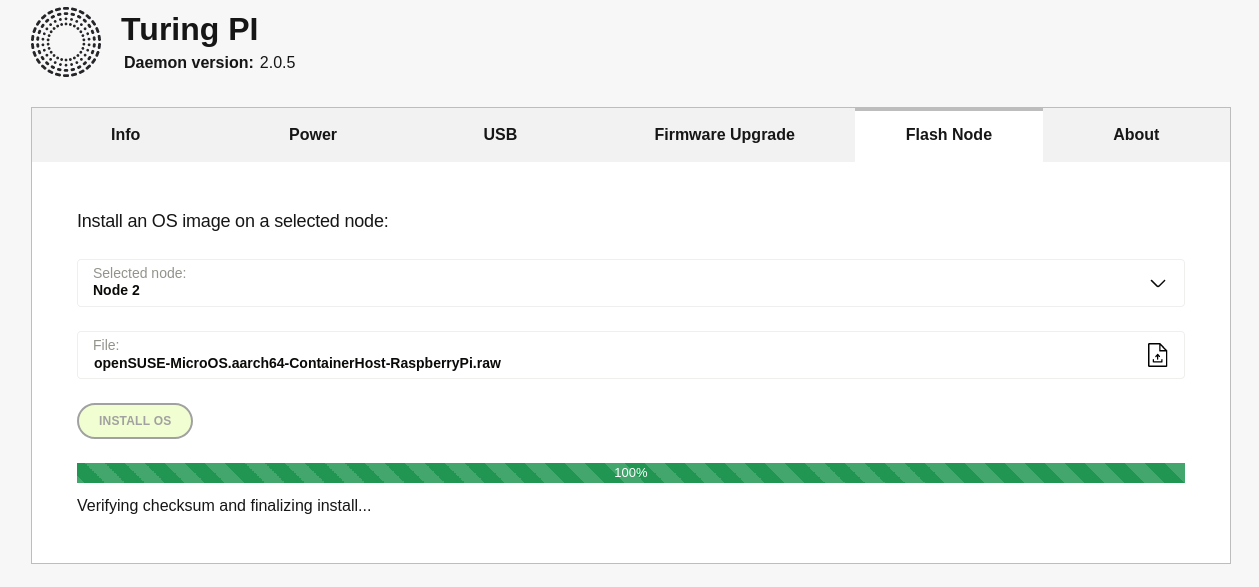
I wanted to use one of my Raspberry Pi Compute Modules as a Kubernetes host, and what’s better suited for this task than a plain simple MicroOS with k3s on it? I have a CM4 that I can use for this task and it’s already in my Turing Pi cluster. Since the recent BMC upgrade, also flashing a new disk image to a CM4 in the Turing Pi 2 works nicely via the WebUI:
This is really nice now and it works flawlessly. After waiting for a little bit, the node was ready and I could in principle power it up. But that will not work nicely, as MicroOS is not configured to allow ssh login by default and it has also no root password set. You’ll end up with a system where you cannot login. We need to configure the disk image via Combustion or via it’s First boot wizard.
Combustion is the go-to way if you want to configure a headless system like this one. You need to create a thumb drive (USB stick) with the partition labeled “combustion” and a script file located in /combustion/script on that partition and then this script will be executed on first boot. This is how you can configure your system - setting a root password, installing packages, adding ssh keys …. It’s literally a custom bash script executed at first startup to configure your own server. See the following basic example:
#!/bin/bash
# combustion: network
echo 'root:$5$.wn2BZHlEJ5R3B1C$TAHEchlU.h2tvfOpOki54NaHpGYKwdNhjaBuSpDotD7' | chpasswd -e
mkdir -pm700 /root/.ssh/
cat pubkeys >> /root/.ssh/authorized_keys
systemctl enable sshd.service
echo "PermitRootLogin prohibit-password" > /etc/ssh/sshd_config.d/local.conf
The Turing Pi has exposed USB ports, that you can in principle redirect to any node. This is nice and would totally work to redirect the USB stick to the CM4, if it wouldn’t be for the tricky part, that the CM4 has it’s USB disabled by default. And that makes the installation of MicroOS a bit difficult …
My first attempt was to try to see if the kernel activates the USB devices and Combustion would configure the system for me. Nope it doesn’t. You can ping the host, but when ssh-ing to it, it will always reply something like
$ ssh root@10.11.12.13          # or whatever the IP of your CM4 is
"System is booting up. Unprivileged users are not permitted to log in yet. Please come back later. For technical details, see pam_nologin(8)."
...
This is a good indicator, that MicroOS is stuck in the firstboot wizard, which you could totally use to set a root password, if you would have a screen attached to the CM4. And if the USB keyboard would work.
So, my second attempt was to re-flash the Node and put it into my Waveshare Base Module. This module allows a compute module (even a MILK-V CM) to be plugged in and exposes USB connectors, a HDMI connector, ethernet and some more peripherals we’re not interested in this blog post.
So I powered it on, only to see to my horror that after some kernel messages the screen turned black. And also the keyboard didn’t work in GRUB which I take as a clear indicator, that USB is indeed turned off, so this will not help me either.
Now, there is a third way: The UART of the Turing Pi cluster!
The Turing Pi has an integrated UART/serial terminal towards the nodes, that can be used as serial terminal [1]. You can use the uncomfortable tpi utility (which is what I did) or directly use the exposed /dev/ttyS{1,2,4,5} device.
Because I’m a bit of a stupid 🐑 that didn’t read the full page I went through the first boot wizard via the tpi utility. You CAN totally do that, but there’s an easier way (See below). For now, let’s follow the way of the sheep and repeatedly read out the current UART via
# tpi uart --node 2 get
This will return one screen. Then you can navigate this screen by sending commands (each command will send also a return), so e.g. to just continue I sent an empty string - which results in the ENTER key being sent
# tpi uart --node 2 set --cmd ''
Then you read the terminal again, see the next screen, send ENTER again and so on. And then of course set the root password
# tpi uart --node 2 set --cmd 'notsecret'
(Of course you should not use this password or change it afterwards.)
But that works. After some commands you have a working MicroOS with a set root password. Now you only need to allow root ssh login
# tpi uart --node 2 set --cmd 'echo PermitRootLogin=yes > /etc/ssh/sshd_config.d/local.conf'
# tpi uart --node 2 set --cmd 'systemctl restart sshd'
And you can finally log into the CM4 via ssh and do whatever you want.
Of course, you could also just have used picocom from the Turing Pi BMC board, and not fiddle around with the tpi command, but where’s the fun in that? 😉
# picocom /dev/ttyS1 -b 115200
Node 2 exposes /dev/ttyS1 for some reason and by using picocom you get a nice and comfortable terminal session, that would have been much simpler to navigate through than the above exercise using tpi.
But it worked, so that’s nice. 🚀🐑
Quick solution
- Flash the
RaspberryPi Container Hostimage from http://get.opensuse.org/microos/ (Alternative Downloads-> All the way down to “Hardware”) to your CM4 - Don’t forget to
unxzthe downlaoded.xzfile. You need to flash therawfile, not the compressed download file! sshto your Turing Pi- Turn on the node (via
tpior via the WebUI)
# tpi power --node 2 on
- Use
picocomto get a serial terminal. Use/dev/ttyS{1,2,4,5}(see below) to access the nodes.
# picocom /dev/ttyS1 -b 115200
The serial-pseudo devices for the nodes are the following
- Node 1:
/dev/ttyS2 - Node 2:
/dev/ttyS1 - Node 3:
/dev/ttyS4 - Node 4:
/dev/ttyS5
(Don’t ask me why - look at what docs.turingpi.com/docs/tpi-uart says)
- Use the first boot wizard to configure your CM4 via the serial terminal
- Enable ssh root login by either editing a file in
/etc/ssh/ssh_config.dmanually or installing theopenssh-server-config-rootloginpackage
Done. Have a lot of fun!