This procedure might brick your device. Proceed with caution, you have been warned.
EDIT: This procedure has been updated on 2026-08-11 given the helpful feedback of helpful people which was helpful.
If you are confused by the whole key nomenclature in UEFI, go and see this excellent blog post for a summary of the different UEFI key types. In this guide we need three key types: The Platform Key (PK), the Key Exchange Key (KEK) and the Signature Database (db). Familiarize yourself with those before proceeding.
I write this blog post as a draft/guide for some people to check and verify before putting this into a more official place. Please check before you type, make sure you understand what’s going on here. If you feel uneasy modifying a system on a UEFI level, then this guide is certainly not for you.
I tested this on my Dell Latitude laptop and in a kvm-based virtual machine.
Caveats set in place, let’s get onto it.
Secure boot with openSUSE keys only
In this guide we’ll be setting up a openSUSE Tumbleweed installation to only boot binaries that are signed with the provided openSUSE key. This means that you can then only boot openSUSE Linux. Not even Fedora or Debian will be accepted. Because if we already have secure boot … why not use it properly?
In this guide we’ll be using the sbctl utility, which is part of the default Tumbleweed repositories.
# zypper in sbctl
- Put the UEFI Firmware into “Custom mode” in Secure boot and erase all keys. In the VM it looks like the following:
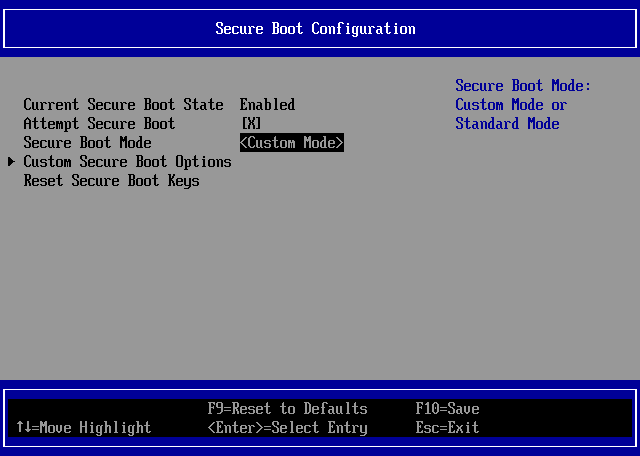
This should disable secure boot and put the system into setup mode. Reboot the system and check the status:
# sbctl status
Installed:	✗ sbctl is not installed
Setup Mode:	✗ Enabled
Secure Boot:	✗ Disabled
Vendor Keys:	microsoft
- Create keys
We need to create our own Platform Key (which is awesome!). This is the master key that allows modifications of the other key types. The Platform Key itself cannot sign a boot binary.
# sbctl create-keys
This will create the key hierarchy/structure in /var/lib/sbctl/keys
Ensure you have backups of those keys!!!
- Obtain SUSE/openSUSE keys
3.1 Get SUSE keys (Needed for SLES, not needed for openSUSE)
We need two SUSE Keys from https://www.suse.com/support/security/keys/:
- The SUSE Secure Boot Signing Certificate Authority certificate (SB CA) to be enrolled in the KEK (to allow enrollment of future keys)
- The actual SUSE Secure Boot Signing Key to be enrolled in the
db
3.2 Get the openSUSE keys (needed for openSUSE (duh!) not needed for SLES)
Get the key from the shim package of from Factory. When shim is installed,
you typically find the key in /etc/uefi/certs/, e.g. here:
/etc/uefi/certs/4659838C-shim-opensuse.crt
For openSUSE this key is used for db and for kek. You will need to use this key for both, using it only for kek means you can’t boot
and using it only for db means you cannot update.
- Configure
sbctlto use the provided keys fordbandkek
Goal: Putting the keys (in der format) into the /var/lib/sbctl/keys/custom/{db,kek}.
We first need to create the custom directories:
mkdir -p /var/lib/sbctl/keys/custom/{db,kek}
chmod 0700 /var/lib/sbctl/keys/custom/{db,kek}
To convert a crt file to der using openssl do the following:
openssl x509 -in FILE.crt -outform DER -out OUT.der
Convert the obtains keys from step 3 to der (see command above) and place the CA key in /var/lib/sbctl/keys/custom/kek
and the Secure Boot Signing Key to /var/lib/sbctl/keys/custom/db. For openSUSE it’s the same key in both locations.
- Enroll keys
To only enroll your own keys use the following command:
# sbctl enroll-keys --custom
sbctl might complain about immutable files but gives you instructions on how to resolve it:
# sbctl enroll-keys --custom
‼ File is immutable: /sys/firmware/efi/efivars/KEK-8be4df61-93ca-11d2-aa0d-00e098032b8c
‼ File is immutable: /sys/firmware/efi/efivars/db-d719b2cb-3d3a-4596-a3bc-dad00e67656f
You need to chattr -i files in efivarfs

# chattr -i /sys/firmware/efi/efivars/KEK-8be4df61-93ca-11d2-aa0d-00e098032b8c
# chattr -i /sys/firmware/efi/efivars/db-d719b2cb-3d3a-4596-a3bc-dad00e67656f
Warning: this does not include the Microsoft keys, which might be needed to load some additional drivers (e.g. 3rd party graphics card drivers). Use --microsoft to also include them, but that also means that everything signed with that key will be able to boot:
# sbctl enroll-keys --microsoft --custom
Without the Microsoft keys, you might encounter this message:
# sbctl enroll-keys --custom
Found OptionROM in the bootchain. This means we should not enroll keys into UEFI without some precautions.

There are three flags that can be used:
    --microsoft: Enroll the Microsoft OEM certificates into the signature database.
    --tpm-eventlog: Enroll OpRom checksums into the signature database (experimental!).
    --yes-this-might-brick-my-machine: Ignore this warning and continue regardless.

Please read the FAQ for more information: https://github.com/Foxboron/sbctl/wiki/FAQ#option-rom
This means there are components in your boot chain that might require additional keys. You have essentially two options:
- Use the Microsoft OEM certificate
- Try to enroll the OpRom checksums as well to allow booting those components (
--tpm-eventlog)
The --tpm-eventlog option is needed if you play around in a VM. It might also be needed on
certain other hardware. Read https://github.com/Foxboron/sbctl/wiki/FAQ#option-rom as the status
might has changed between writing this guide and you reading it.
And at this point it’s also safe to assume that --yes-this-might-brick-my-machine will indeed brick your device, so
that’s not really an option IMHO.
On the Dell test laptop this was not necessary, in the test VM using --tpm-eventlog worked fine. But you do you.
- Reboot and verify
Now reboot and check if secure boot is enabled with your own keys:
# sbctl status
Installed:	✓ sbctl is installed
Owner GUID:	ad058ef7-3165-4726-bc63-97527fdfe8be
Setup Mode:	✓ Disabled
Secure Boot:	✓ Enabled
Vendor Keys:	tpm-eventlog custom
Test if your setup is only accepting the openSUSE keys e.g. by trying to boot a Fedora iso (or Ubuntu or something similar). That should not be possible anymore because the boot process will only accept the SUSE/openSUSE keys from here onwards. Nice!